3D Character Design & Modeling: In-depth Guide for Beginners
By: Nexas 3D Team
Home » 3D Character Design & Modeling: In-depth Guide for Beginners
Table of Contents
This isn’t just another beginner’s guide – it’s a deep dive into real industry workflows for 3D character modeling, built on expert insights and practical course material.
We’ll take you from the fundamentals of character design all the way to creating an optimized, game-ready model, ensuring every step is explained with a beginner-friendly approach. Whether you’re aiming for games or animation, these techniques will help you craft characters that are both visually stunning and technically sound.
Some techniques may vary depending on the software you use, but the core principles remain the same. No matter your tool of choice, this guide will help you bring your character to life in the most efficient way possible.
The first step in character modeling is understanding design and stylization—after all, a great model starts with a strong artistic vision. Let’s get started!
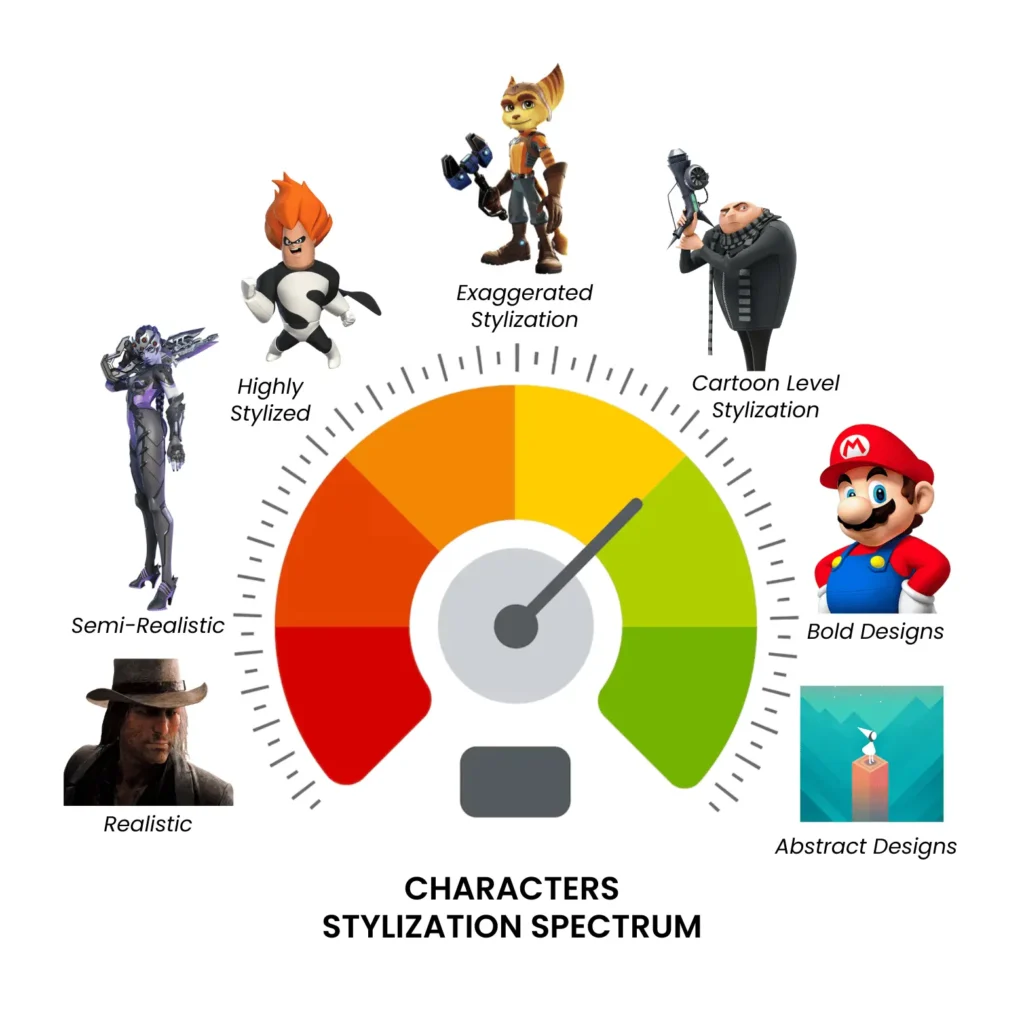
The Stylization Spectrum
Stylized character design exists on a broad spectrum, especially in video games. Let’s explore this spectrum, starting with the most realistic characters and moving toward the most abstract.
Character Design
Why is Character Design Important for a Character Modeler?
As a character modeler, you will often be working with designs created by others. If the design is already established, you might wonder why understanding character design is necessary. The answer is simple:
The more you know about character design, the better you will be at interpreting it in 3D, enhancing its appeal, and ensuring a faithful yet visually striking adaptation.
Now, we will explain the stylization spectrum by giving example of each.
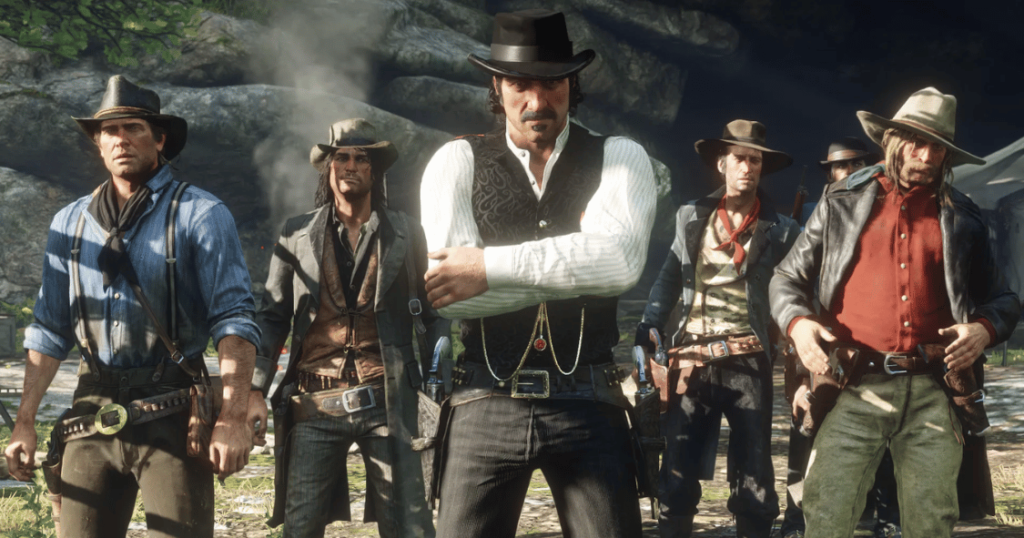
1. Realistic Characters
Source: variety.com
At one end of the spectrum, we have highly realistic characters that verge on the uncanny valley. Examples include characters from the Uncharted series or John Marston from Red Dead Redemption.
While these characters aim for realism, they still incorporate elements of caricature. Their proportions remain close to reality, and their materials are detailed with grit and grime, enhancing their believability.
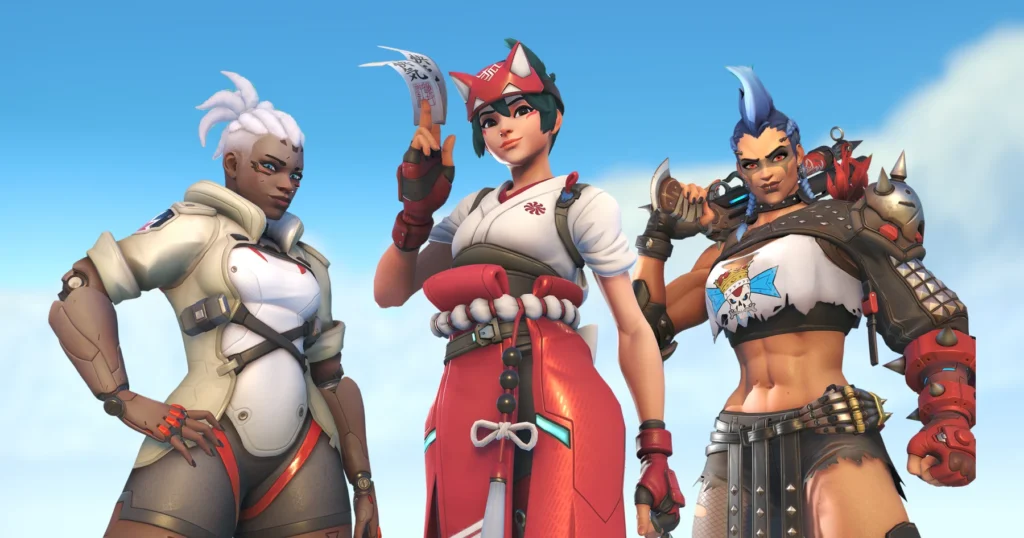
2. Semi-Realistic Characters
Source: overwatch.blizzard.com
Moving slightly away from realism, we arrive at semi-realistic designs, exemplified by Overwatch. These characters still have realistic proportions, but their shapes are smoother, their silhouettes are stronger, and their color palettes are bolder and more stylized.
Despite the stylization, they retain a high level of detail. Overwatch characters are an excellent case study for aspiring character modelers, as they demonstrate superb design and modeling principles.
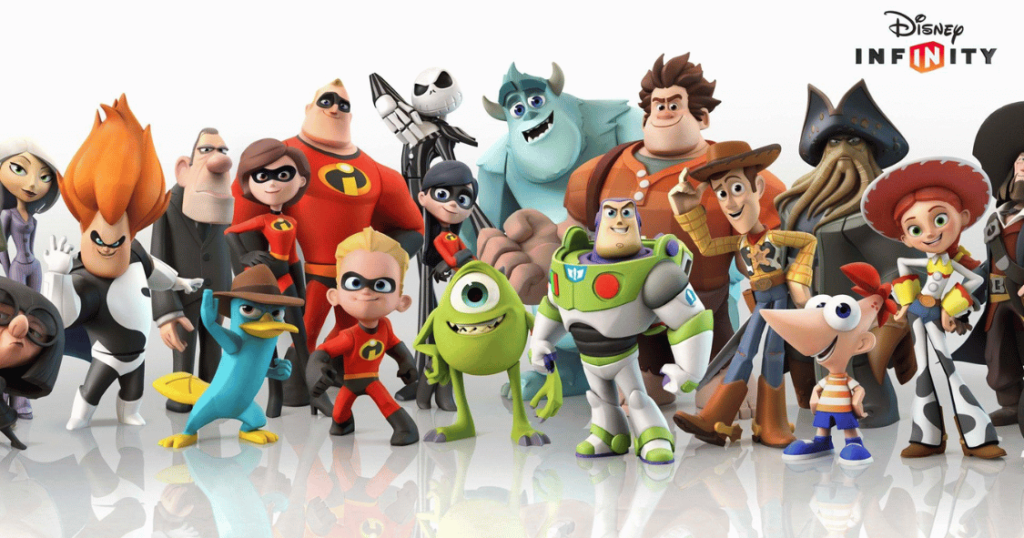
3. Highly Stylized Characters (Disney Infinity)
Source: Reddit.com
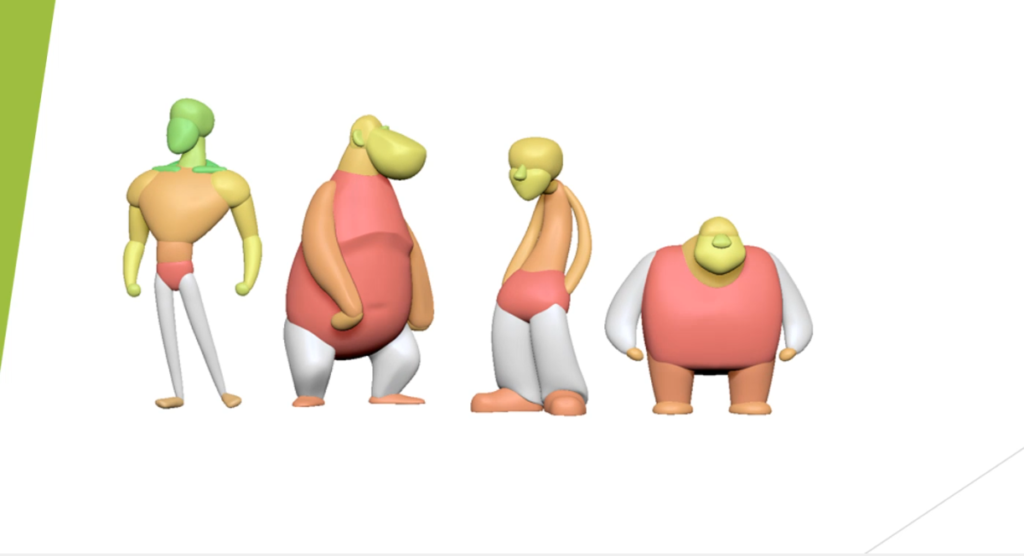
Disney Infinity, represents the next step in stylization, focusing on a clean, stylized look while preserving each character’s essence.
Compared to Overwatch, Disney Infinity characters have:
Larger shapes
More exaggerated proportions
Simplified materials
Hard-flowing edges that guide the eye through the design
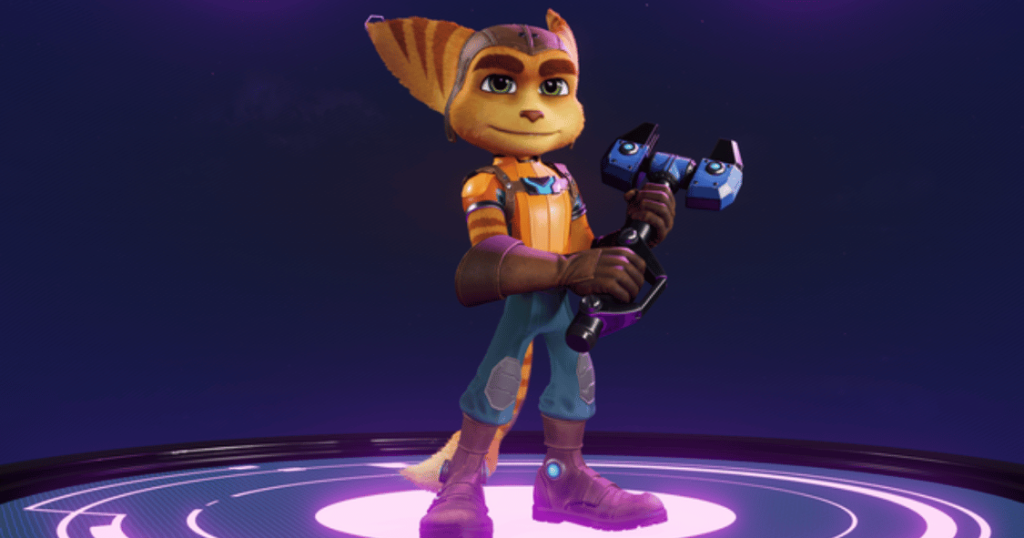
Next, we have Ratchet & Clank, which takes stylization even further. Compared to Disney Infinity:
The designs are more exaggerated
The character models remain simplified, but the textures are more detailed
This approach is often seen in film as well — simple models with highly detailed textures, depending on the art director’s vision.
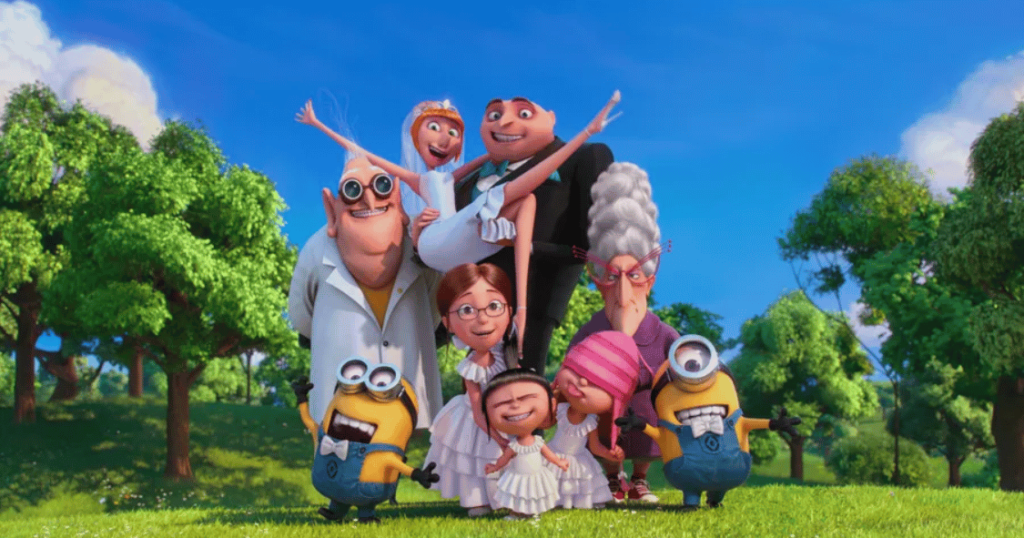
5. Cartoon-Level Stylization (Despicable Me)
Source: wallpapersok.com
A great film example of this style is Gru from Despicable Me. While his design is highly exaggerated, the textures of his clothing maintain realism and detail. This contrast between stylization and texture realism is a powerful design tool.
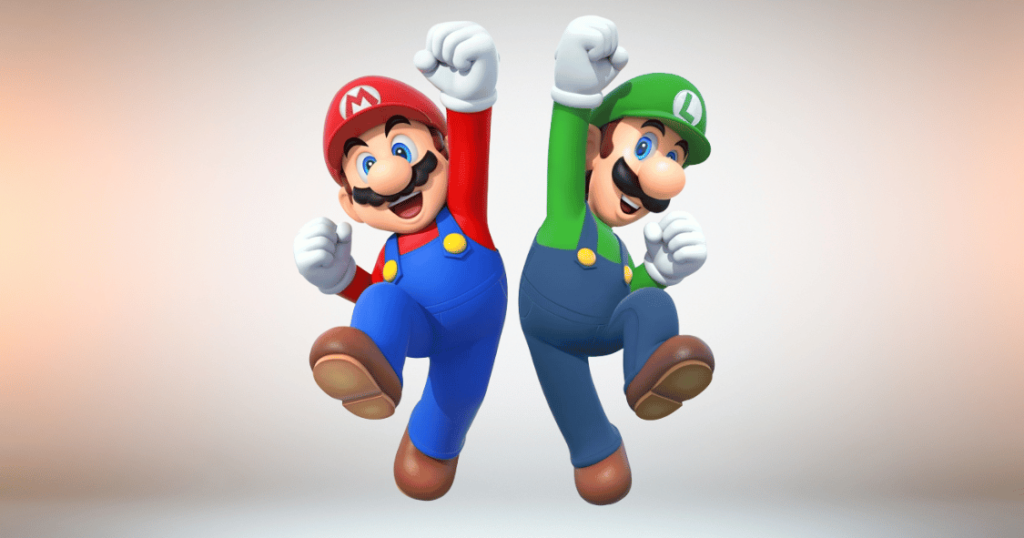
6. Iconic and Bold Designs (Nintendo’s Mario)
Source: nintendo.fandom.com
Nintendo’s Mario is a prime example of bold, completely non-realistic proportions and vibrant colors. His design is so iconic that he is instantly recognizable in silhouette, no matter the pose.
At this point in the Stylization Spectrum, realism is almost non-existent.
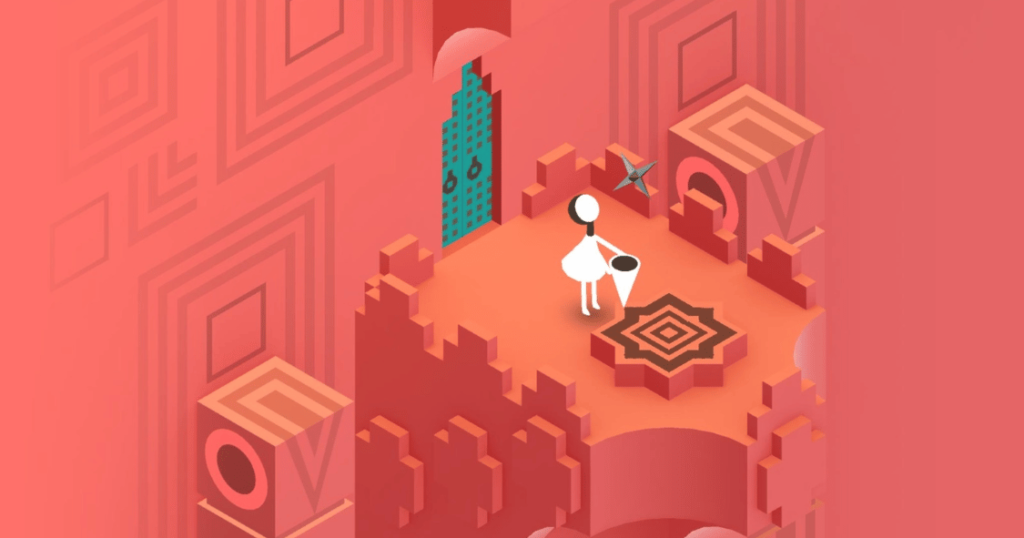
7. Abstract Minimalism (Monument Valley)
Source: svg.com
At the farthest end of the spectrum, we find highly abstract designs, such as those in Monument Valley. These characters are built from simple, primitive shapes. While the game itself is 2D, it serves as an excellent representation of how far stylization can go.
That wraps up our introduction to Character Design and the Stylization Spectrum.
Now, we will explore the design rules that make these characters so visually appealing.
Let’s dive in!
Shape Design
Design Rule #1: Shape Design
We’ll discuss the importance of Shape Language.
So, what is Shape Language?
Simply put, it’s the ability to communicate design ideas using simple shapes.
Artists often overcomplicate things too quickly. Embrace simplicity and start with the boldest, clearest, and least complex shapes possible. Clarity in design should always come first; the details come later.
The Power of Primitive Shapes
See how simple shapes can define character personality.
The easiest way to understand Shape Language is to recognize how a character’s personality can be conveyed through repeating shapes:
Spheres (Round Shapes) → Friendly, soft, and innocent characters.
Squares (Blocky Shapes) → Strong, stubborn, and stable characters.
Triangles (Sharp Angles & Spikes) → Devious, cunning, or even evil characters.
As a character modeler, it’s your job to identify these repeating shapes and make sure they are well-represented in the final design.
Examples of Shape Language in Characters
Let’s analyze how primitive shapes influence a character’s personality:
Round Characters → Portray innocence, kindness, or youth. We naturally find them more appealing (e.g., babies, puppies, and cute mascots like Kirby). Round, soft shapes are also associated with feminine qualities (not necessarily female, but soft and gentle).
Square Characters: Represent strength, stubbornness, stability, or leadership. While they can seem boring, they also give off a sense of heroism and dependability.
Triangular Characters: Often linked to villains and monsters, triangles suggest danger and cunning. However, not all triangular characters are evil—it depends on how the shape is used. The direction of the triangle also matters:
A triangle pointing upwards suggests a bottom-heavy character.
A triangle pointing downwards suggests a top-heavy character.
Mixing and Matching Shapes
There are no strict rules in shape design! You can combine different shapes to create unique personalities.
Source: Disney/Pixar
The above example for character from Disney Infinity is example of a round, soft monster can still have sharp, triangular teeth to suggest danger.
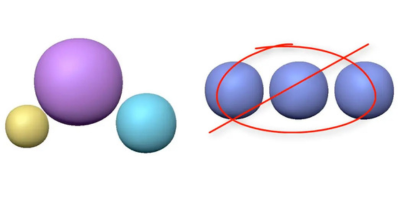
For a well-designed character, always include a mix of:
Large shapes
Medium shapes
Small shapes
This creates visual balance and keeps the character interesting.
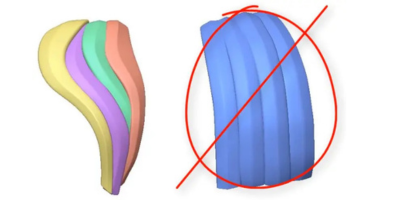
Rhythm and Flow
Design Rule Number #2: Rhythm and Flow
Now, let’s talk about the importance of rhythm and flow in your character.
So, what is Rhythm and Flow?
Well, rhythm and flow go together like peanut butter and jelly. When we talk about rhythm and flow, we are talking about how your eye moves through and around the character. You want the viewer to see the character as a whole design and not just as individual parts.
Source/Credit: Disney Infinity
Take a look at how the shapes of this character in above image flow into one another.
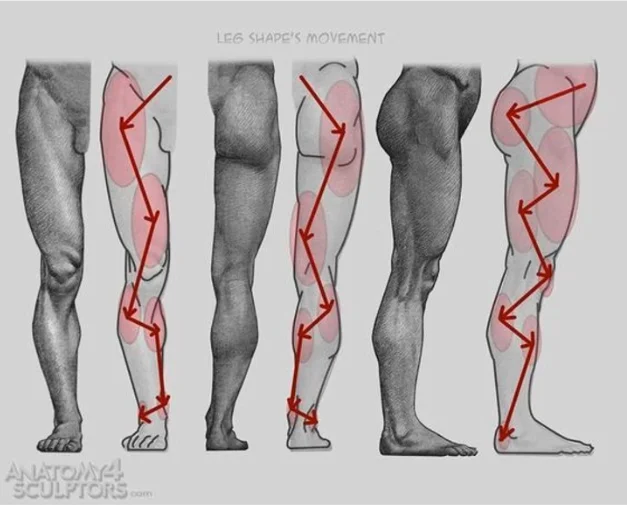
Muscles have a rhythmic pattern to them. Take a look at this image from Anatomy for Sculptors. Notice how the muscles have a natural rhythm as they go down the leg.
Source: Anatomy for Sculptors
Here are some more examples of rhythm and flow:
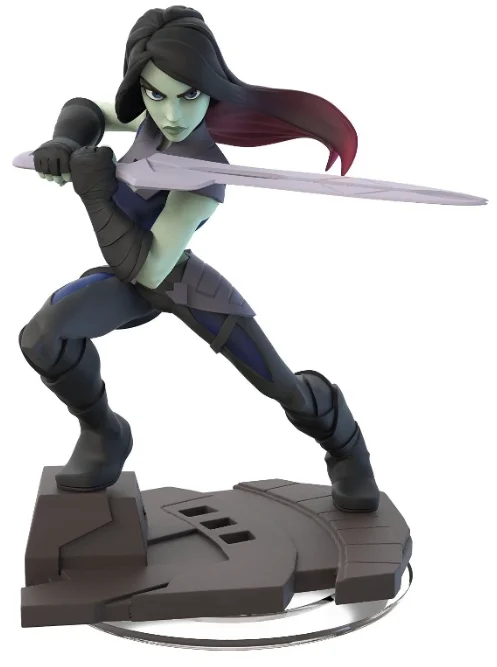
Source: Disney Infinity
Take a look at how Gamora’s hair flows with the direction of her pose.
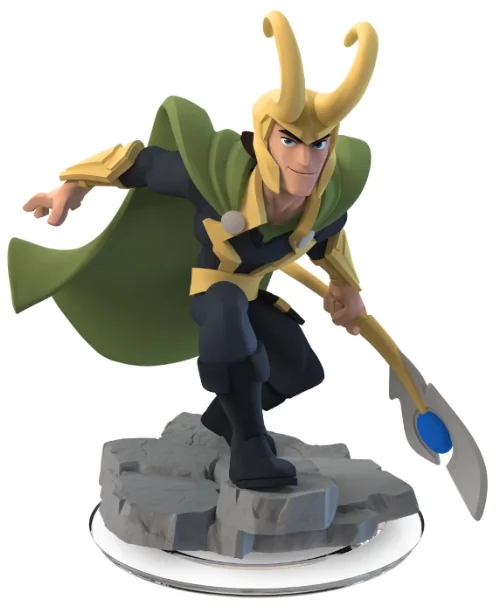
Source: Disney Infinity
Another example of flow is in Loki’s cape. The way it moves helps describe the direction of his pose as well.
A fantastic resource on character design is a book called 100 Tuesday Tips by Grizand Norm. It is written by a highly skilled couple working at Disney and is filled with priceless tips on character design.
Once again, as a character modeler, it will be your job to notice rhythm and flow in the character design. Look for opportunities to enhance these elements wherever you can. Rhythm and flow go a long way toward creating an appealing character.
Silhouette
Design Rule #3: Silhouette
Now we’re looking at silhouettes and why they play a key role in character design.
What is a Silhouette, and Why Does It Matter?
If you strip away all the colors, textures, and lighting from a character, what remains is the silhouette—a simple black shape. In 3D design, maintaining a clear silhouette from multiple angles can be tricky, but being mindful of it will help make your character more recognizable and visually appealing.
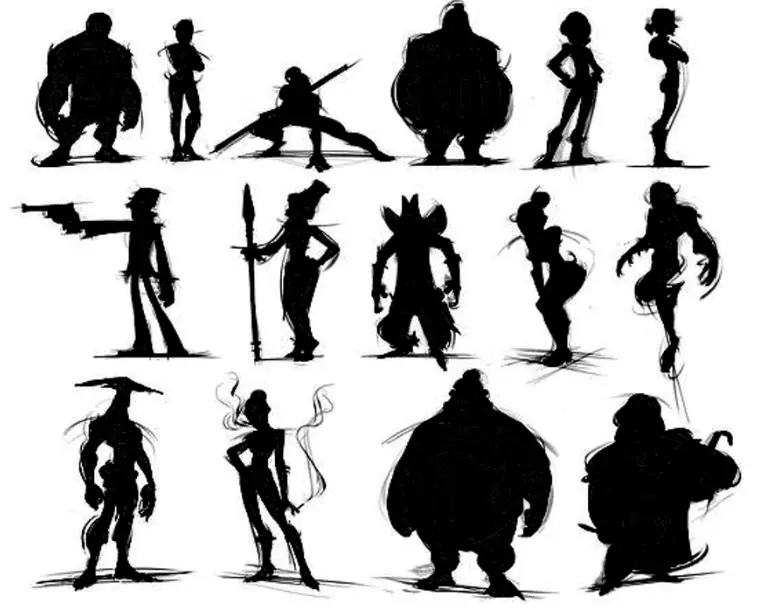
Credit: Joshua Black
Take a look at these examples from Joshua Black. Notice how each silhouette instantly conveys important details. Whether the character is male or female, big or small, energetic or sturdy. The silhouette forms the foundation of how a character is perceived at first glance.
A great example is how you can recognize a friend from a distance just by their outline. That same principle applies to character design strong silhouettes make characters more memorable and distinct.
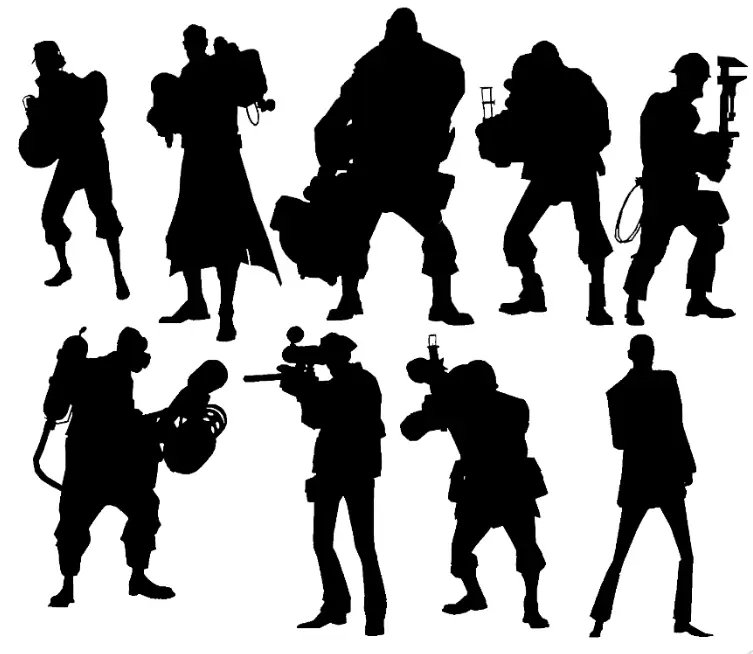
Example: Team Fortress
Source: Valve Corporation
Valve Software did a great job using silhouettes in Team Fortress. The goal was to make each character instantly recognizable, even from across the map. Because of their unique shapes, you can easily tell one character from another just by their outline.
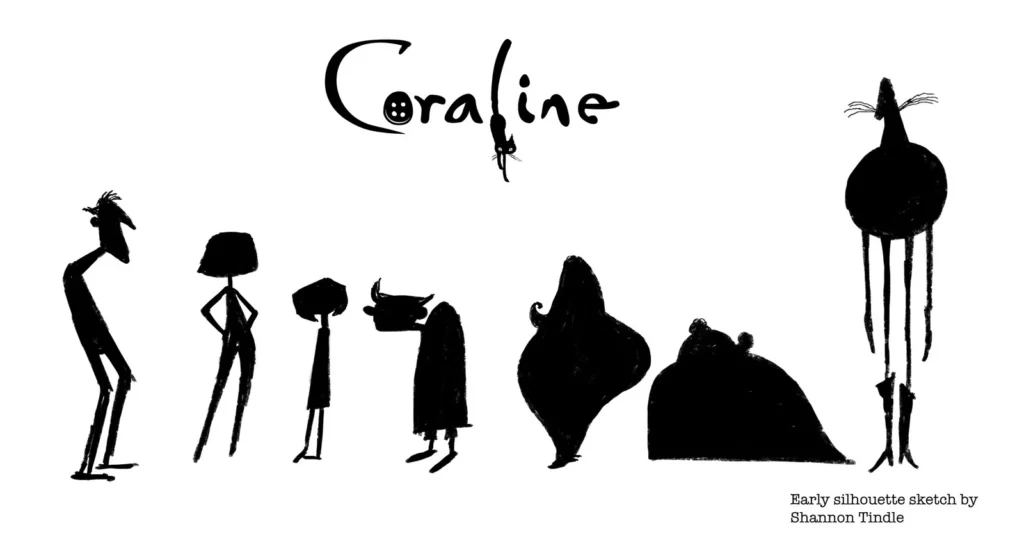
Example: Coraline
Credit: Shannon Tindle
The film Coraline is another great example. The characters have highly readable silhouettes that enhance their overall design, combined with strong shape language.
Straights Against Curves
Design Rule #4: Straights Against Curves
Now, will talk about a great way to add interest to your designs using straights and curves.
So what do we mean by straights and curves?
Let’s take a look.
Straights against curves is another way of adding interest by using opposing surface shapes. It’s naturally appealing to have an object be asymmetrical, especially if that object has more detail on one side than the other.
Remember the book I mentioned above? Yes 100 Tuesday Tips book by Griz and Norm. Here is great example from this book.
Source: 100 Tuesday Tips Book
Straights against curves can also help with tension and relaxation.
Keep in mind that when we use the term straight, that doesn’t mean pull out your ruler. Straight is relative. You can still have a curved line that favors straight.
Straights usually occur on the bony side of objects, while curves happen on the more fleshy or fatty sides as shown in the image.
Variety & Interests in character design
After following the all design rules, you might be asking yourself, How do you add more interest to your designs?
Well, through a little thing we like to call variety.
Variety means changing the character of an element to make it different. Good design is achieved through a balance of unity and variety. The elements need to be alike enough so we perceive them as belonging together, yet different enough to be interesting. It’s a fine balance.
The best way to explain this rule is with a bunch of “Do this, not that” examples.
Credit: Shane Olson
Variety through size and color: Notice how changing the size and color alone makes the design more visually appealing and interesting.
Credit: Shane Olson
Variety with S-curves instead of parallel lines: Remember the flow rule? It applies here as well.
Curves & Direction: Find ways to add movement using curves and direction. Look at your model from all angles to ensure visual interest from each perspective.
Variety through Surface Thickness: This technique mimics thick and thin lines in drawings.
One last thing before moving on—asymmetry is more interesting than symmetry. Look for ways to ensure your character has asymmetry in one way or another. Nothing organic is perfectly symmetrical.
Simplification & Exaggeration
You might be asking yourself, How do we go about stylizing a character?
Well, there are several techniques that contribute to stylization. Let’s go over them now.
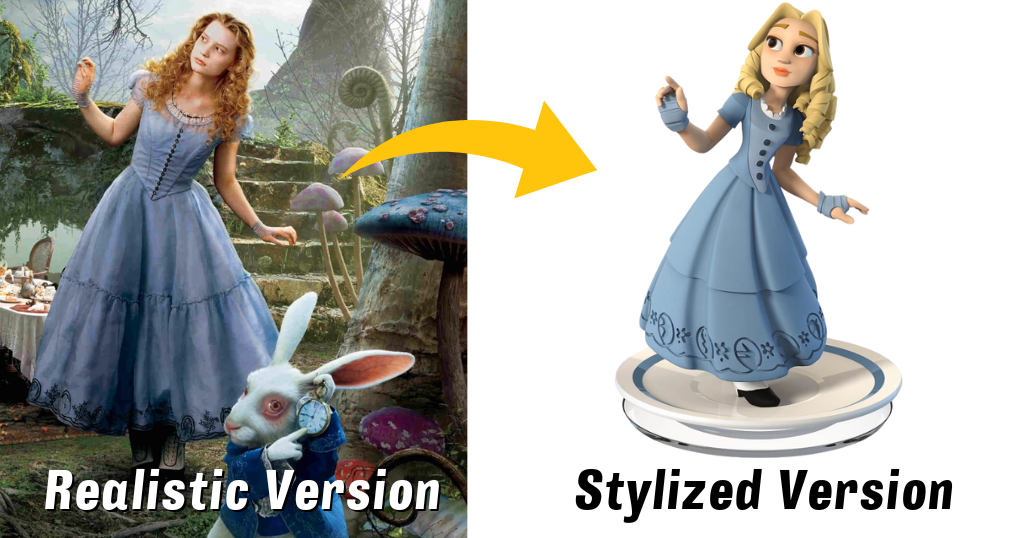
Simplification
The first technique is simplification, which means taking something complex and making it more minimal.
For example, imagine designing a historical soldier’s uniform. A real uniform might have intricate buttons, embroidery, and layered fabrics.
In a stylized version, you could reduce the number of buttons, simplify the patterns, and smooth out the textures while keeping the essence of the design intact.
Here is great example showing Alice from wonderland in movie vs a stylized version. Notice the dress and buttons that are simplied
Simplification applies to colors, clothing patterns, hair, surface smoothness, and more. It is much easier to simplify a realistic character rather than a pre-designed one because there’s more detail to reduce.
Exaggeration
The second technique is exaggeration, which is commonly found in caricature. The idea is to take large things and make them larger while making small things even smaller.
Here is great example for exaggeration from David Boudreau.
Credit: David Boudreau
Exaggeration plays a key role in making characters visually engaging. From facial features to body proportions, pushing certain elements can create a more distinct and recognizable character.
A well-stylized character balances both techniques to create something appealing and interesting to look at.
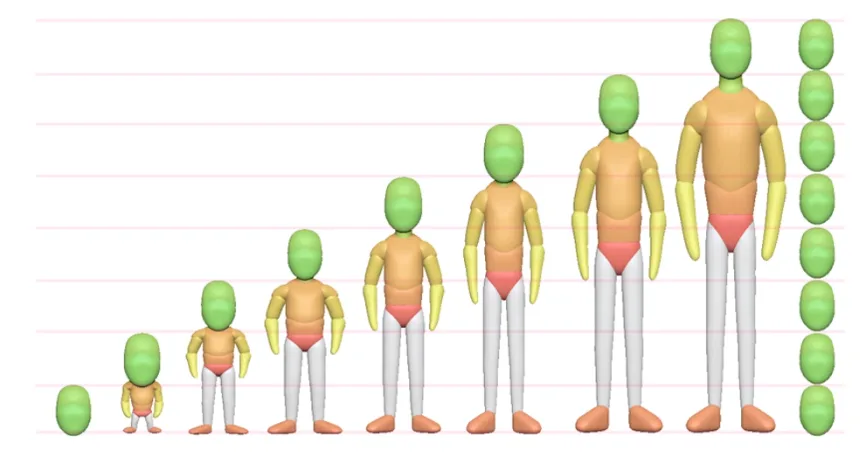
Proportions
Now, Let’s talk about proportions and how to use them as a tool in character design.
What is Proportion?
Proportion refers to the relative size of different parts within an object. In character design, proportions are often measured in heads—meaning how many head lengths fit into the full height of the character.
Source: Shane Olson
For example:
A typical human figure is around 7.5 heads tall.
Heroic characters, such as superheroes, are often 8 to 9 heads tall to appear more powerful.
Stylized and cartoon characters can range anywhere from 2 to 6 heads tall, depending on the desired effect.
Understanding realistic proportions is important because it allows you to break the rules intentionally while maintaining believability.
For instance, if you’re designing a child character, you might make the head larger in proportion to the body to emphasize youthfulness. On the other hand, a villain might have elongated limbs and a smaller head to create a more sinister look.
Practical Example
Think of a fantasy warrior character. If you want them to look strong and dominant, you could:
Broaden the shoulders beyond realistic proportions.
Shrink the head slightly to enhance the perception of bulk.
Lengthen the legs for a more heroic stance.
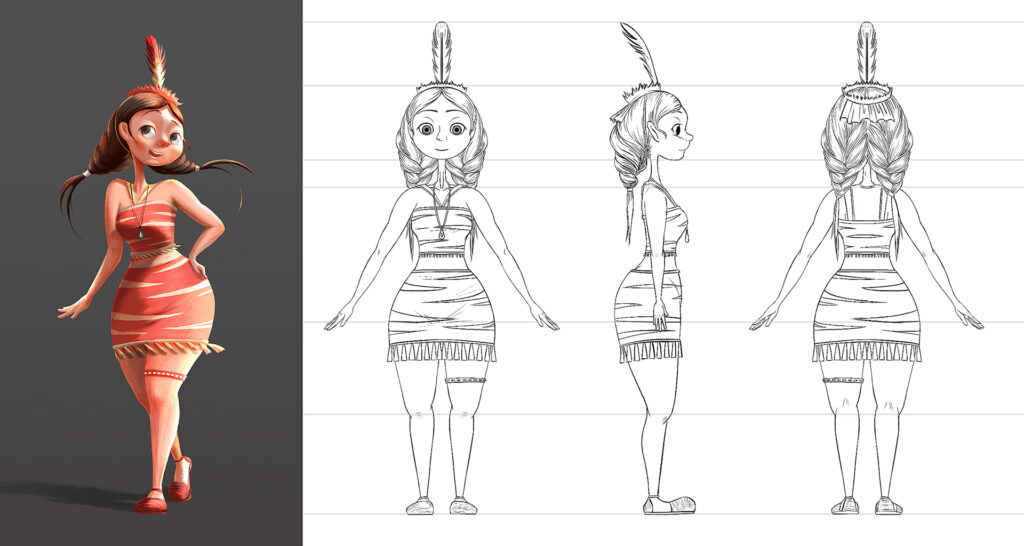
Character Concept Design
Before you start modeling, selecting the right character concept is crucial. Here are some key guidelines to help you choose wisely:
1. Avoid Creating Your Own Concept
While designing your own character can be fun, most professional 3D modeling jobs involve bringing someone else’s artwork to life. Unless you’re already a concept artist, it’s best to focus on translating existing designs into 3D.
2. Pick a Concept with a Three-Quarter View
Avoid designs that are only drawn from the front or side, as they lack depth and make it harder to understand the character’s volume. A three-quarter view is ideal for translating 2D art into 3D.
Example of Three Quarter View Concept
Credit: Danna Zhang
3. Don’t Model an Existing 3D Model
Choosing a character that has already been turned into a 3D model can be a mistake. Your work will always be compared to the original, making it harder to stand out. Instead, pick a fresh design that hasn’t been modeled yet.
4. Look for an Obscure Character
Highly popular characters, like Mickey Mouse or well-known superheroes, come with high expectations. A lesser-known design will allow you more creative freedom and serve as a better portfolio piece.
5. Match the Concept to Your Skill Level
If you’re just starting, avoid characters with complex outfits, armor, or accessories. A simpler design will help you focus on mastering anatomy and form before diving into details. You can always refine your skills with more intricate models later.
6. Start with a Character Bust
If modeling a full-body character feels overwhelming, start with just the head and shoulders. This helps build confidence and improves your sculpting skills before tackling a full figure.
Example of Three Quarter View
Credit: ayaTosu
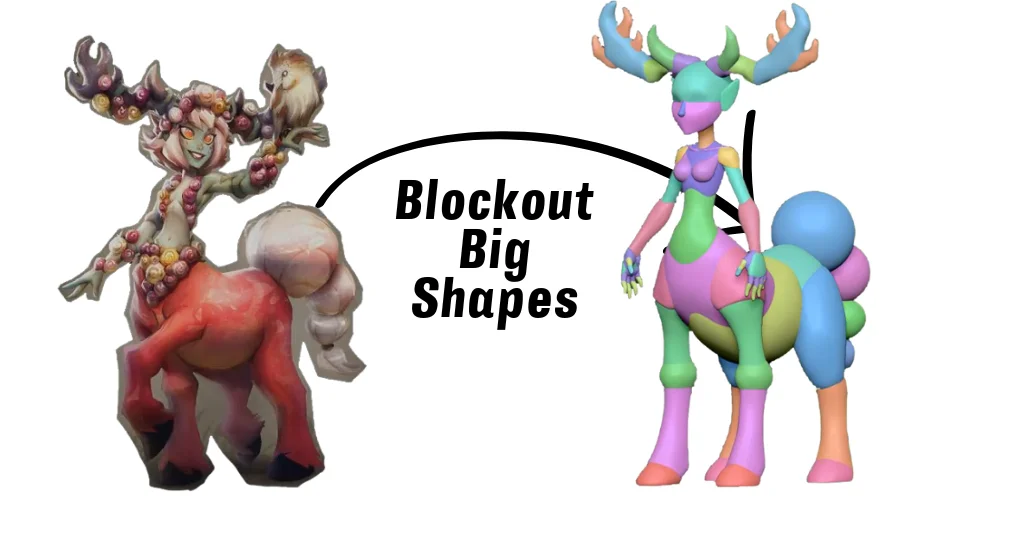
Character Blockout
This method may be new to most of you, especially if you’re coming from the world of traditional box modeling. This method is more like putting together balls of traditional clay to form a larger object. It’s a lot of fun.
Example for stylized character blockout
Credit: George Zaky @artstation
Blocking out characters is a lot like sketching. The more you do, the better you’ll get at it. There is no rule when it comes to where to start.
Blockout Rules
When blocking out characters, there are several things to keep in mind. Remember all of the character design rules and try to adhere to them whenever possible.
Proportion
The number one design rule to focus on while blocking out your character is proportion. The easiest way to get correct proportions is to measure. Typically, you measure a character concept by using heads.
Sculpt What You See, Not What You Know
Just like drawing, try looking inside the character to find the big abstract shapes. Look for large, medium, and small shapes. The goal is to put just enough shapes in there to define the volumes, the silhouette, and the surface structure, but not add every little bit of detail.
Example of adding enough shapes to define volume, the silhouette, and the surface structure.
Credit: Johannes Helgeson @artstation
It’s a good idea to block out the general larger shapes first, especially if the clothing has a lot more volume than the character underneath. You will be using these new forms to draw new geometry on top of.
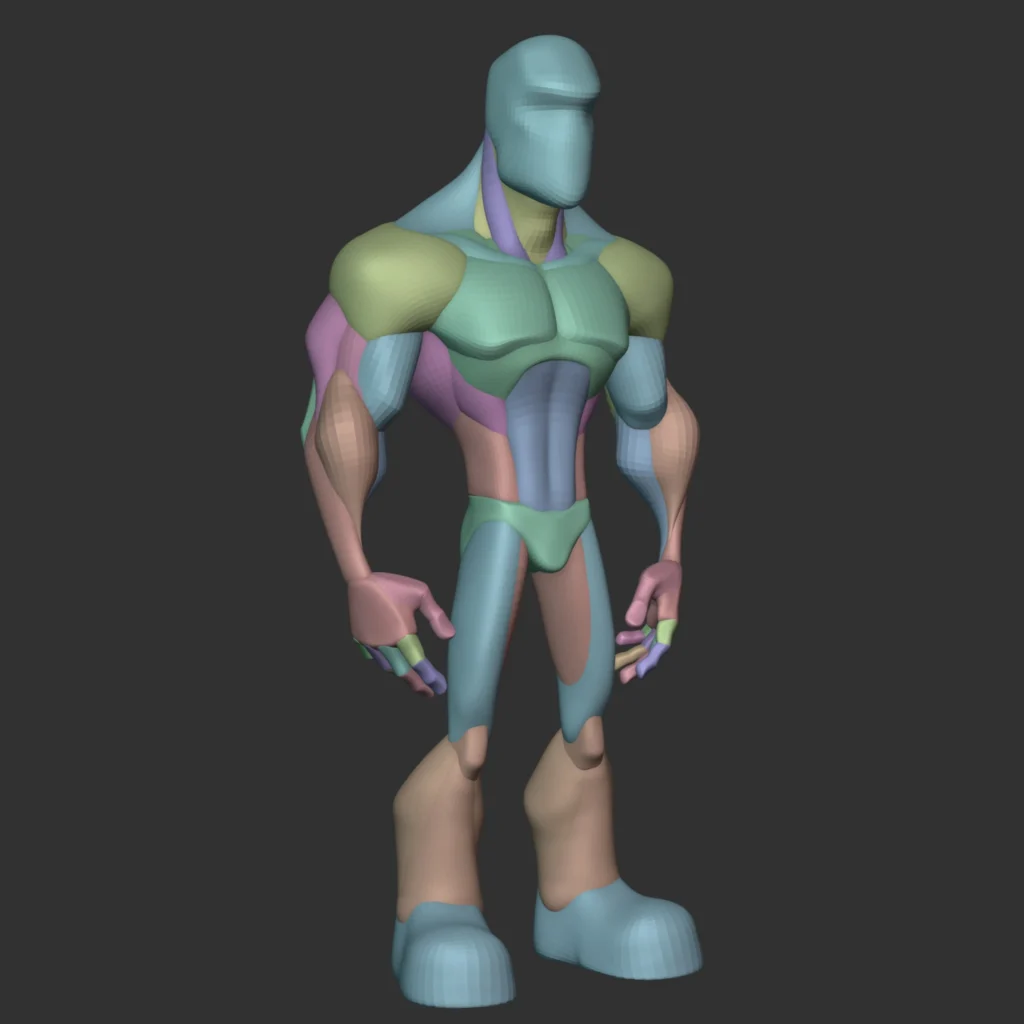
Character Detailing
Once the character’s proportions and primary shapes and blockouts are established, the next step is detailing, which adds depth and realism to the model. This process can be done in Blender, ZBrush, or any sculpting software.
The detailing process depends on the software used. We have included both ZBrush and Blender sculpting techniques to cover different workflows.
Detailing Aspect
ZBrush
Blender
Surface Detailing
Uses DynaMesh for freeform sculpting.
Uses Dynamic Topology (Dyntopo) for sculpting.
Fine Details
Sculpting skin pores, scars, fabric textures, fine creases using Alphas & Brushes.
Similar detailing using Brushes & Texture Stencils.
Clean and Polished Forms
Uses Clay, Polish, and Smooth brushes for refining.
Uses Clay, Smooth, and Scrape brushes for refinement.
Texturing & Painting
Polypaint allows painting directly on the model.
Vertex Paint for directly applying textures.
UV Mapping
Uses UV Master for automatic UV unwrapping.
Uses Smart UV Project or manual unwrapping.
Clothing & Fabric
Uses Cloth Brushes for sculpting wrinkles and folds.
Uses Cloth Simulation for dynamic folds.
Props & Accessories
ZModeler for hard surface modeling.
Uses Boolean and Hard Surface Modeling techniques.
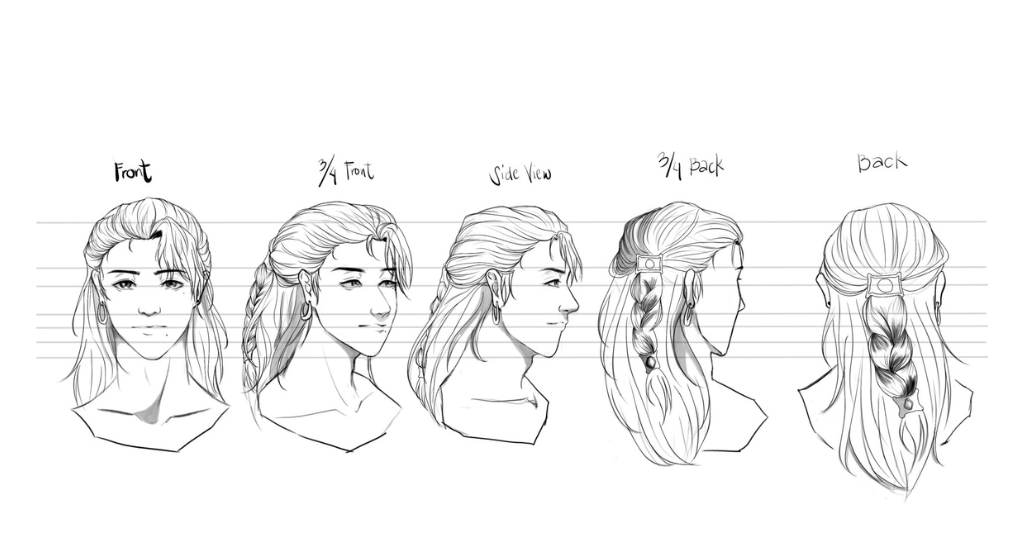
Creating Hair
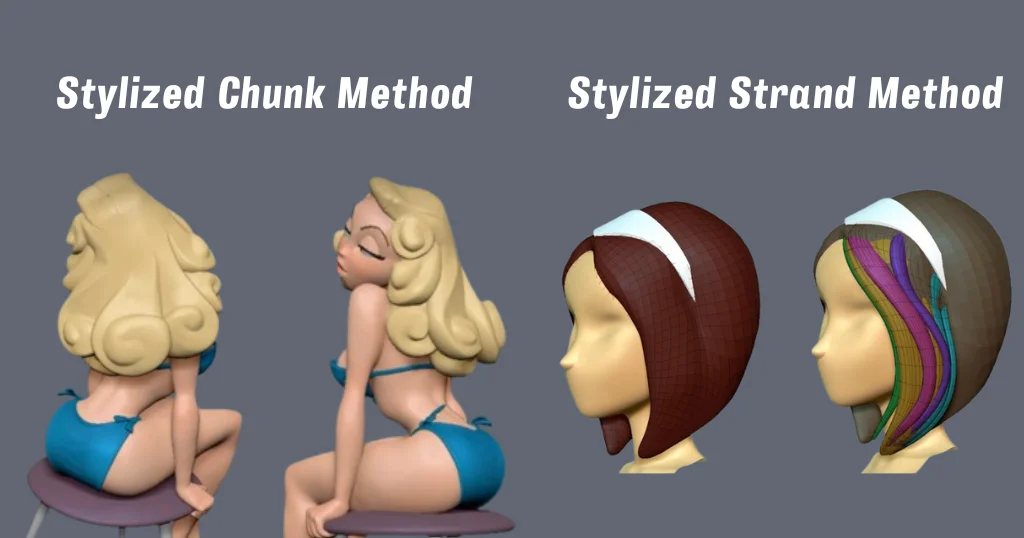
Not all hair is created equally. There are different approaches depending on the style you want to achieve. Some styles work better for real-time applications, while others are suited for highly detailed models.
Example of stylized chunks and stylized strands
Source: Shane Olson
We’ll focus on two methods: stylized chunks and stylized strands. At first, creating hair can feel overwhelming, so let’s break it down into manageable steps.
What’s Important About Hair?
Hair is unpredictable, but it still follows fundamental design principles. These include:
Shape language
Rhythm & flow
Silhouette
Balance of straights & curves
Variety & exaggeration
One of the most critical aspects of hair is how it frames the face. Even small adjustments to this framing can drastically alter a character’s appearance.
The shape of the hairline also plays a role, typically, female hairlines are more rounded, while male hairlines are squarer. Always use references to guide your design.
Stylized Chunk Method
Hair should be blocked out just like the rest of a character’s form. A simple approach is to start with a basic shape, then refine it gradually.
Below is a simple approach to make a basic shape, we are not getting into how these are made in software, a i t will depend on what sculpting or modeling software you are using
Blocking the Base Shape
Adding Volume & Detail
Refining Seams & Transitions
This technique works well for characters with simplified or exaggerated hair designs.
Stylized Strand Method
Like the chunk method, the strand approach starts with blocking out the general shape. However, this method focuses on creating individual strands for more dynamic and layered results.
Starting with the Base Shape
Placing the Strands
Refining & Adjusting Flow
Final Touches & Variety
Detailing the Face
Many people ask how to create appealing faces, but there’s no magic trick—just knowledge, practice, and a strong understanding of facial anatomy. A keen eye for proportions and subtleties is essential.
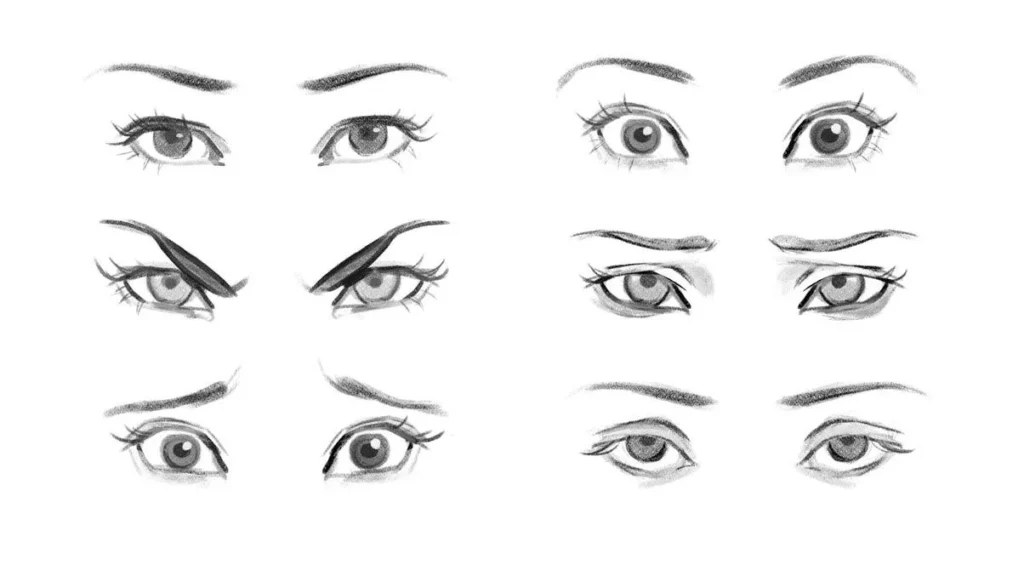
Eye Shape
The eye shape is one of the most important aspects of a character’s appeal and is often overlooked.
Eyes are the “windows to the soul,” and getting their shape right is crucial. Remember:
Eyes are not round—only irises are.
The top of the iris is often partially covered by the eyelid.
Pay attention to straight and curved lines in the design.
Always study the original concept carefully and match the eye shape as closely as possible.
Eye Expression
Expressions dramatically change a character’s look. That’s why it’s best to pose the character early—this makes approvals easier and ensures the eyes contribute to the overall appeal. Once posed, the difference can be striking, almost like two different characters.
Achieving Likeness & Matching the Concept
If you’re working on a caricature or trying to capture a likeness, here are some key tips:
Don’t rely only on front and side views. Instead, focus on the three-quarter silhouette from both the front and back.
Check your model from above (forehead view) and below (chin view) to ensure smooth arcs and avoid pinching.
Compare facial features in relation to each other. For example, measure the distance from the top lip to the nose and match it precisely.
Achieving a strong likeness comes with practice and careful observation.
Preparation for Posing
Nex wee will explore why posing a character is beneficial, even though rigging is typically used for posing. Posing within ZBrush allows you to retain all high-resolution details and paint without needing a low-resolution game mesh, UVs, or map transfers—making it a great workflow advantage.
Why Pose Your Character Early?
There are several reasons to pose your character as soon as possible:
Faster Approvals: A posed character is more engaging and easier for clients or teams to approve.
Brings the Character to Life: A single pose can capture the character’s personality and essence.
Creative Exploration: Posing helps discover new aspects of the character that can be refined in the neutral pose.
Final Steps for Making a Game-Ready Character
Now that you have understood the choosing concept, character design and character modeling, we move on to the final steps to ensure our character is fully optimized for in-game use. The same principles apply for animation, as an optimized character is essential for smooth performance in both real-time engines and pre-rendered cinematics.
There are some steps which will depend on which software you are using for 3d modeling. But as a guide, we will walk you through final steps to optimized the character for best of their use
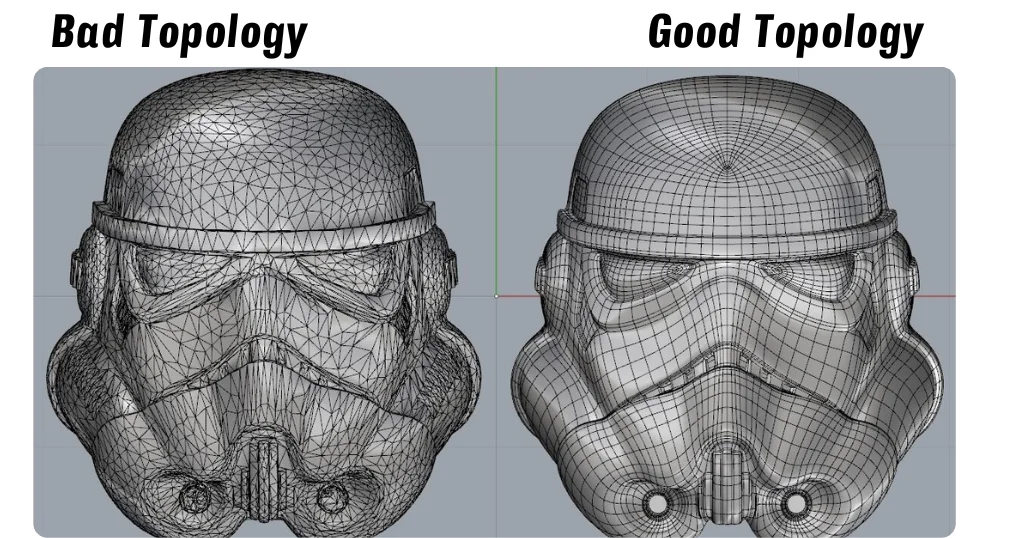
1. Retopology for Deformation
Example of good topology and bad topology
Credit: Sergio Romero @artstation
Retopology ensures that the character’s mesh has clean and efficient edge flow, allowing for smooth deformations during animation. Good topology should:
Follow the natural muscle structure and joint bends.
Avoid unnecessary poles and n-gons.
Ensure even polygon distribution, with more density in deformation-heavy areas (face, elbows, knees).
2. UV Mapping
UV unwrapping lays out the 3D model’s surface onto a 2D plane, allowing textures to be applied correctly. Important UV considerations:
3. Baking Maps
Baking is the process of transferring high-poly details onto a low-poly model using texture maps (Normal, Ambient Occlusion, Curvature, etc.). This helps retain high-quality detail while keeping the polycount low.
Wrap Up!
You’ve now walked through the entire process of 3D character modeling, from initial design to final optimization. Whether you’re creating characters for games, animation, or digital art, the principles remain the same—efficiency, detail, and optimization are key.
While some steps may differ based on the software you use, the foundation you’ve built here will help you adapt and refine your workflow over time. As you continue practicing, you’ll find ways to speed up your process, improve your topology, and enhance your texturing and rigging skills.
NEED HELP CHOOSING THE RIGHT 3D SPECIALISTS? CONTACT US NOW – WE’LL BUILD THE PERFECT TEAM FOR YOUR PROJECT!
3ds Max is widely used for game development, architectural visualization, and high-poly character modeling. It excels in polygon modeling and rendering, offering tools like Chamfer Modifier, UV Unwrapping, and Arnold Renderer.
Unlike Maya, 3ds Max is more scene-oriented, making it popular for cinematic sequences and environment design. While not the top choice for animation, its integration with third-party plugins like V-Ray and Corona Renderer makes it an industry favorite for rendering high-quality characters and assets.
Autodesk Maya
Autodesk Maya is an industry-standard software used in AAA game studios, film production, and VFX. It offers powerful rigging, animation, and rendering tools, making it the preferred choice for character animation and complex scene creation.
Studios like Pixar, Ubisoft, and Naughty Dog rely on Maya for high-end projects. Its advanced simulation tools, including Bifrost for fluid simulations and nCloth for realistic fabric movement, make it indispensable for professional animators. However, Maya has a steep learning curve and requires a subscription-based license.
ZBrush
Pixologic ZBrush is the leading software for sculpting ultra-detailed 3D characters. It is used in films, collectibles, and AAA games for creating high-poly, realistic models. Unlike traditional polygon modeling, ZBrush uses dynamic tessellation, allowing artists to sculpt freely without worrying about geometry constraints. Its polypainting and auto-retopology tools streamline the character design pipeline.
ZBrush is commonly used alongside Maya or Blender, as it lacks robust animation features. It is a one-time purchase software, making it more affordable in the long run than subscription-based tools.
Blender
Blender is a free, open-source software widely used for indie game development, animation, and VFX. Despite being free, it offers powerful sculpting, rigging, and rendering capabilities. Its real-time Eevee render engine and industry-standard Cycles renderer make it a great choice for artists looking for a cost-effective alternative to Maya and ZBrush. Blender also features Grease Pencil for 2D/3D hybrid animations and supports third-party plugins for motion tracking and simulations. Its only drawback is that it can be resource-intensive on large projects, requiring high-performance GPUs for smooth workflow.
Daz Studio
Daz Studio is a beginner-friendly 3D character creation tool, commonly used for digital art, animations, and game asset creation. It comes with a vast library of pre-made models, textures, and assets, allowing users to create characters without starting from scratch. Unlike Maya or Blender, it focuses on posing and rendering characters rather than full-scale 3D modeling. It integrates well with NVIDIA Iray for high-quality renders but lacks professional rigging and animation features.
Top 3D Characters Marketplaces
Here’s a list of the top marketplaces where users can purchase high-quality 3D characters:
TurboSquid – One of the largest 3D asset marketplaces with professional-grade models.
CGTrader – Offers a vast collection of 3D characters, including game-ready and rigged models.
Sketchfab Store – Provides interactive 3D previews and a variety of high-quality character assets.
Unreal Marketplace – Ideal for game developers looking for characters optimized for Unreal Engine.
Unity Asset Store – A go-to marketplace for Unity developers seeking ready-to-use 3D characters.
FlippedNormals – Focuses on premium-quality assets curated for industry professionals.
ArtStation Marketplace – Features unique, artist-created 3D models, including stylized characters.
RenderHub – Provides affordable and diverse 3D character models, including rigged and animated options.
Cubebrush – Sells both stylized and realistic 3D characters, along with brushes and resources.
Hum3D – Known for its highly detailed and realistic 3D characters and assets.
NEED HELP CHOOSING THE RIGHT 3D SPECIALISTS? CONTACT US NOW – WE’LL BUILD THE PERFECT TEAM FOR YOUR PROJECT!